I've been playing around with this idea for awhile in my head and today it came to fruition. I made a Boo Boo Buster Bag! Perfect size to throw in a purse, diaper bag, backpack or the car. I think I might make one for my car. It's amazing how often I need some sort of first aid like thing (bandaids and tissues, mostly) I need in my car. I think I'll throw some granola bars in there as well.
I had super cute puppy and kitty fabric. So I thought I'd play around with it. I made a little red cross patch to put on the bag. I played around with the design of the patch. First I had a pieced red cross but it was way to big. Felt was so much easier. And just making a square patch was kind of boring so I made it a circle.
I'm thinking of making these for my shop. I've been looking for something new to make to give my shop a little boost. Hopefully, this is the solution.
I think it turned out pretty cute.
Close up of the red cross patch. It's top stitched down.
I little demo of what you could put in it.
I made the lining of bag nylon. That way it could be wiped out if need be. I'm not used to sewing with nylon. It's kind of a pain. But I like the results.
I hadn't planned on squaring the bottom of the bag but after looking at it, I decided it'd be cuter with a squared bottom. Plus that means that it will stand up on it's own.
Zipper.
Reverse side of the bag. Check out the dog and cat! So cute! A quilting friend, G, gave me the fabric. I think she made some pajamas for one of her daughters.
Showing posts with label Craft Projects. Show all posts
Saturday, May 5, 2012
Tuesday, March 20, 2012
New Rhino for O
After a frustrating few hours of job hunting, I decided to take a break. I babysit O one day a week. He is turning 1 on Sunday. The family knows that I'm crafty and I wanted to make something. I had previously decided to make him a rhino. I tried out the pattern and made Blueberry from my previous post. Today I made O's rhino.
Check him out. I think he turned out pretty cute. It is definitely a boy rhino. I hope that O has a lot of fun playing with him in the future.
Saturday, March 17, 2012
Meet Blueberry!
I have the privilege of babysitting the cutest little munchkin one day a week. He is going to be 1 in a couple of weeks and I have been wracking my brain trying to figure out what to make for him. I wanted to make something for him. So I decided to make him a rhino. I got a cute rhino pattern from Funky Friends Factory. This is the same person who made the octopus pattern.
I try to try patterns before I make the one I'm giving away. So I made Blueberry. I had a pretty tie-dyed purple fleece and a light green for accents. The pattern didn't call for accent colors, but I decided Blueberry needed some green feet and ears.
Front view. I tried out french knots for the eyes. I'm trying to make the eyes ultra baby proof. The munchkin is in major teething mode and I don't want to risk safety eyes. I have had some issues with them falling out of polar fleece.
The side view.
And as a friend just dubbed it: "Rhiney Hiney"
I took her on a little adventure outside to meet an azalea bush. It was actually NOT raining for this picture.

The other side.
Blueberry's head and hiney, chillin' on a dianthus plant.
I try to try patterns before I make the one I'm giving away. So I made Blueberry. I had a pretty tie-dyed purple fleece and a light green for accents. The pattern didn't call for accent colors, but I decided Blueberry needed some green feet and ears.
Front view. I tried out french knots for the eyes. I'm trying to make the eyes ultra baby proof. The munchkin is in major teething mode and I don't want to risk safety eyes. I have had some issues with them falling out of polar fleece.
The side view.
And as a friend just dubbed it: "Rhiney Hiney"
I took her on a little adventure outside to meet an azalea bush. It was actually NOT raining for this picture.
The other side.
Blueberry's head and hiney, chillin' on a dianthus plant.
Monday, March 12, 2012
Mission: Secret Octopus
There I am with my niecelet. (She will be a "niecelet" until she gets a bit bigger.) I am honored to be adopted into their family.
Anyways, back to the octopus. I made one for myself. I had to try the pattern. Her name is Ophelia. And who doesn't need an octopus of their very own.
I have to give a shout out the pattern designer. Funky Friends Factory has absolutely amazing animal patterns! Her patterns are just elegant. That's the only way I can describe them. She is the same person who created the platypus pattern. (You can adopt your very own platypus in my Etsy shop.) Please check out her other patterns at Funky Friends Factory! Her patterns are great for beginners. Her site talks about 7 year olds sewing her patterns.
On the same trip where I got to visit the niecelet, I was able to pick up the secret octopus fabric. The main color is going to be the brown with orange spots. This will be a collaboration between myself and A. I'm going to do most of the sewing. The octopus will the be mailed flat (and they don't like that!) to A so she can do the stuffing and finishing. I'm excited to get started on the octopus!
Stay tuned for Mission: Secret Octopus updates.
P.S. I am hopefully NOT spoiling the surprise. Otherwise, I've made a big woops!
Saturday, March 10, 2012
Hexipuff bag tutorial!
So here goes. My first tutorial. I just took what seems like millions of pictures while I was making this bag.
SUPPLIES:
1 fat quarter of outside fabric*
1 fat quarter for inside lining*
1 fat quarter for inside pocket and pocket lining*
decor bond (or heavy interfacing)
nylon zipper (at least 12")
basic sewing supplies
*I had 3 coordinating 1/2 yard cuts for the bag in my tutorial. You need enough fabric to cut out the pieces. This is a great project to use up largish scraps. If you want to use 1/2 yard cuts, feel free, but you will have some fabric left over. If you DO NOT use 1/2 yard cuts, the pocket outside and lining will be from the same fabric. I like to have the coordinating tones. Look at the pictures below to see what I mean.
CUTTING INSTRUCTIONS:
For the bag:
from outside fabric: cut two 10" x 11" pieces (if you're using a directional fabric the long side will be the top an bottom of the bag.)
cut a 1" strip that is at least 6" long (for zipper)
from lining fabric: cut two 10" x 11" pieces
from decor bond: cut two 9 3/4" x 11" pieces
For the Pocket:
from fat quarter or lining fabric: cut one 9 3/4" x 11" piece (outside of pocket)
from pocket lining fabric: cut one 8 1/2" x 11" piece (inside of pocket/coordinating edge)
cut on 2 1/2" x 12" strip (for optional wrist strap)
Last bit of cutting before the sewing begins! From the outside, lining, and decor bond pieces, measure and cut out a 1 1/2 squares from the bottom corners. I measure, mark, and then use scissors to cut these out, not the rotary cutter.
Measure 1/2" squares.
Cut them out.
Here's all three sets with corners cut out. I keep the two layers together and just mark the top layer. This is pretty easy with the fabric. The decor bond can be a bit slippery.
LET'S SEW! (use 1/4" seams)
Step 1: Prepare your zipper.
Measure and mark on the zipper 0" and 9 1/2" inches. If you use a longer zipper you don't have to be near the little metal end that can get in the way. You should have something that looks like this:
Next take the 1" strip and cut it into two pieces. I like them longer rather than shorter. you'll trim them later on so don't worry too much about the length. The should be at least 3" long to make your life easier.
Next, you'll pin the two 1" pieces to the zipper. Line up the edge of the fabric strip with the marking you made earlier. Pin in place.
Hint: make sure that the zipper tab is in between the two pieces you just pinned on. If you don't, you'll never be able to pen your bag.
Here's both pieces pinned in place. Note that the nonpinned side of the strip sticks into the middle of your zipper, not the other way around.
Using a 1/4" seam sew the two strips down.
Fold them back so you can see the right side of the fabric.
Top stitch in place.
Trim the ends of the zipper.so it is even with the seam. This will reduce the amount of bulk you'll be sewing later. Somehow, I missed taking pictures of this step.
Set zipper aside
Step 2: Make a pocket.
Take your two pocket pieces (outside and lining)
Line them up and sew along a LONG end of the pocket using a 1/4" seam.
Iron open.
Fold the lining fabric back behind the main pocket fabric. These two pieces will now be WRONG sides together. You should see a 1/4" strip of the lining fabric on the top edge of the pocket.

Top stitch along the upper edge.

Cut out 1 1/2" squares from the bottom corners like you did before.
Line up the pocket with one of the lining pieces.
If you'd like to have pockets on both sides of the bag, feel free to repeat the process to make a second pocket for the other side.
I hate it when items slip down into the bottom of the bag. To prevent this, I measure from corner to corner from the squares I cut out previously. I mark this line and then top stitch in place. This also helps hold the pocket and lining together.
Hint: I would baste along the edges of the pocket as well. Then they will be held in place while you complete the rest of the sewing on the bag. I just used pins, but I wish I had taken the time to baste them.
Step 3: Time to put in the zipper!
Mark the middles of the zipper, lining and outside fabric of the bag. I just use pins.
Layer the pieces of your bag: lining, zipper, outiside. The WRONG side of the zipper will be against the lining of the bag, while the right side of the zipper will face the right side of the outside fabric.
Pin in place, using the middles you marked earlier. Next, sew in place using a zipper foot on your machine. I use my fingers to feel where the zipper is and line up the foot. I like pins. Definitely use them for zippers.
Repeat for the other side.
Hint: If you have the option of using a needle-down on your machine, use it! Zippers are fiddly. I sew part of the zipper and then I unzip/rezip the zipper as needed to get it out of the way of my needle and then finish sewing the zipper.

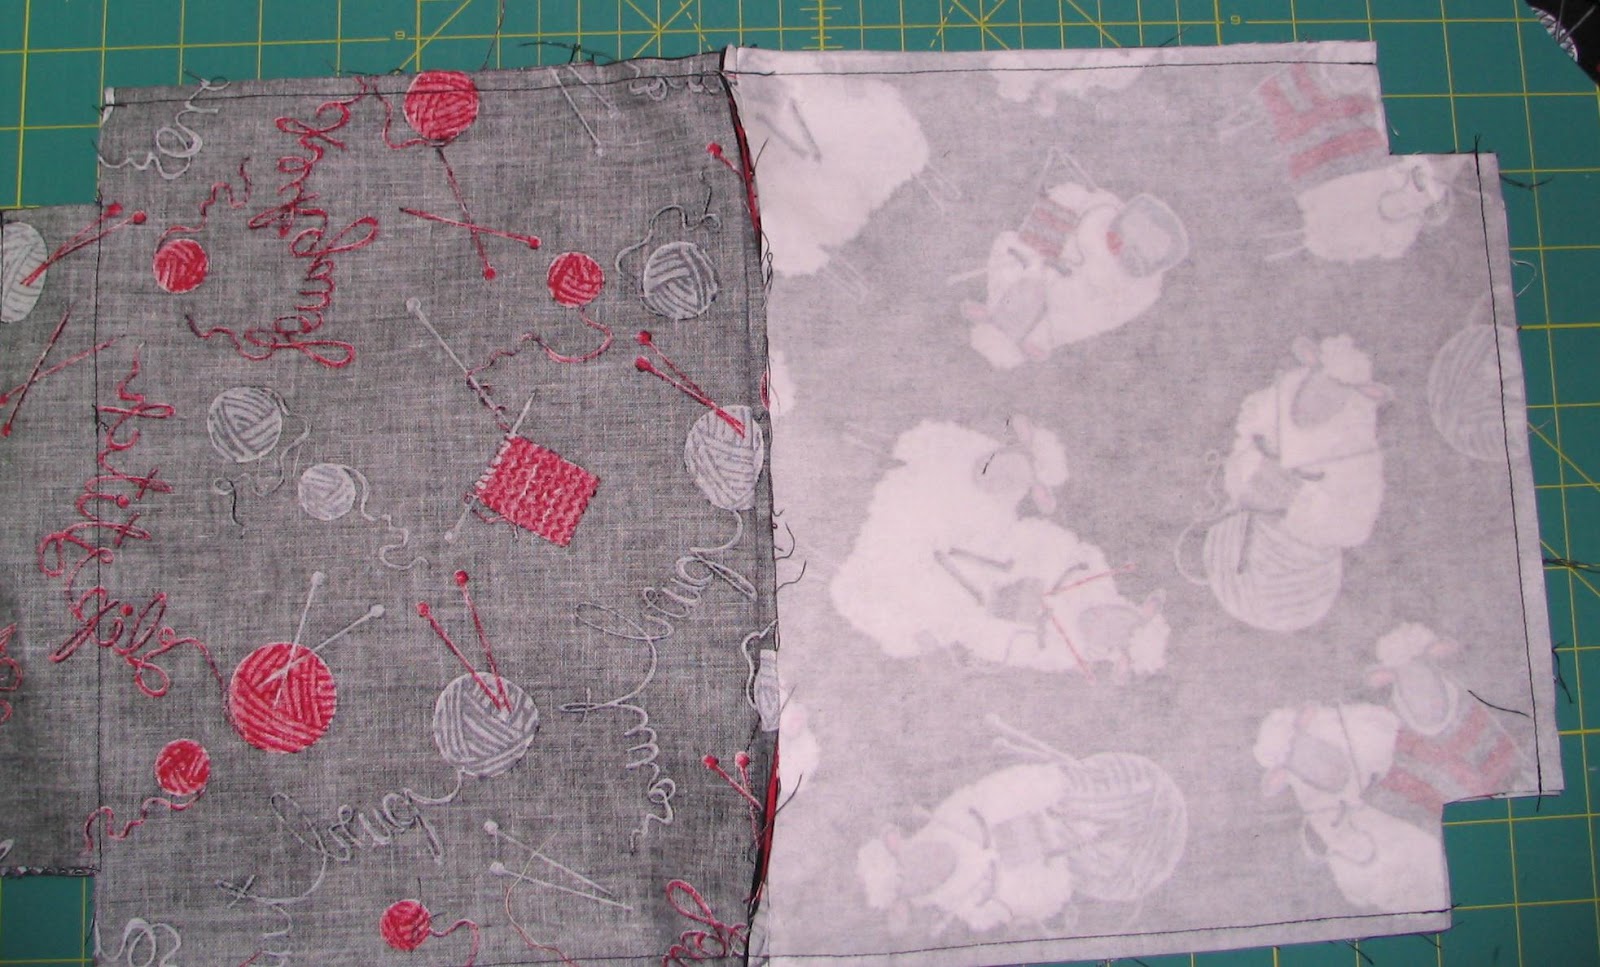
When you've completed your zipper seams, it opens up to look like something like this. You can see how the outside fabric has the right side of the zipper. The little zipper fabric strips are sticking off and it's almost time to trim them.
Here is the reverse side with the pocket and the wrong side of the zipper.

Iron the zipper seams open. Take some time to do this. Make sure the fabric is far enough away from the zipper that it opens and closes freely.
A good trick is to line up the corners that you cout out previously.
Now it's time to add the decor bond. Zippers are so fiddly that I decided I didn't want to have to sew through decor bond in the initial zipper seam.
The decor bond is going to be ironed against the WRONG side of the outside fabric. Try to line up the corners that have been cut out.
I lay just one side flat on my ironing board, with the three other pieces sticking off the back. I take the decor bond and slide it up snug to the zipper seam. The decor bond sits under that seam allowance.
Iron in place. Follow the instructions that come with the decor bond or heavy interfacing.
Repeat on the other side.
Now, place the layers back in place so that you can see the zipper.
Top stitch the zipper in place. This will catch the decor bond you just ironed on.
Step 4: Make a strap. This is optional. If you don't wan the strap, just skip to the next step.
Take the 2 1/2" x 12" strip and iron in half.
Open it up, and then fold the two raw edges into the middle.
Here you can see them both ironed to the middle
Iron flat.
Top stitch along both long edges.
Place the strap on the size of the bag where the zipper tab is when it's closed.I measured about an inch down and pinned my strap in place
Step 5: Time to sew the bag together! Let the fun begin!
If you haven't trimmed the fabric strips from the end of the zipper, do that now. Trim them so they are even with the side of the bag.
You're going to pin the lining pieces together and the outside pieces together.
HINT: make sure you leave the zipper at least half way open. If you don't, you won't be able to turn your bag right side out!
Lots of pins. Pin all four sides. Leave a portion open on the bottom of the LINING of the bag. You need this so you can turn your bag right side out.
Sew around the edges. DON'T sew the corners you cut out. You'll sew those in the next step to create a bottom for your bag.
Here you can see the section that I left open to turn the bag.
Step 6: Create the bottom of your bag.
Open the seams up and match them in the middle. This is creating a squared bottom to the bag.
Using 1/4" seams sew along all four corners.
Here you can see the bottom of the outside of the bag. (inside out) This is a better picture to show how the seams come together and you sew the edges together.
Step 7: Turn the bag right side out through the opening in the bottom of the lining.
Use your fingers to push out the corners of the bag.
Open up the zipper all the way and push the edges of it out as well.
I iron 1/4" seams on the opening.
Pin it and sew it shut with a blind hem stitch or whip stitch. You could also just use a straight stitch on the machine and close the opening if you wish.
Push the lining into the bag. You're done!
Here's a picture of the pocket.
Thought: you could create multiple pockets by adding some top stitching on the pocket.
Step 9: Enjoy your new hexipuff bag!
Here is the final product:
1 fat quarter of outside fabric*
1 fat quarter for inside lining*
1 fat quarter for inside pocket and pocket lining*
decor bond (or heavy interfacing)
nylon zipper (at least 12")
basic sewing supplies
*I had 3 coordinating 1/2 yard cuts for the bag in my tutorial. You need enough fabric to cut out the pieces. This is a great project to use up largish scraps. If you want to use 1/2 yard cuts, feel free, but you will have some fabric left over. If you DO NOT use 1/2 yard cuts, the pocket outside and lining will be from the same fabric. I like to have the coordinating tones. Look at the pictures below to see what I mean.
CUTTING INSTRUCTIONS:
For the bag:
from outside fabric: cut two 10" x 11" pieces (if you're using a directional fabric the long side will be the top an bottom of the bag.)
cut a 1" strip that is at least 6" long (for zipper)
from lining fabric: cut two 10" x 11" pieces
from decor bond: cut two 9 3/4" x 11" pieces
For the Pocket:
from fat quarter or lining fabric: cut one 9 3/4" x 11" piece (outside of pocket)
from pocket lining fabric: cut one 8 1/2" x 11" piece (inside of pocket/coordinating edge)
cut on 2 1/2" x 12" strip (for optional wrist strap)
Last bit of cutting before the sewing begins! From the outside, lining, and decor bond pieces, measure and cut out a 1 1/2 squares from the bottom corners. I measure, mark, and then use scissors to cut these out, not the rotary cutter.
Measure 1/2" squares.
Cut them out.
Here's all three sets with corners cut out. I keep the two layers together and just mark the top layer. This is pretty easy with the fabric. The decor bond can be a bit slippery.
LET'S SEW! (use 1/4" seams)
Step 1: Prepare your zipper.
Measure and mark on the zipper 0" and 9 1/2" inches. If you use a longer zipper you don't have to be near the little metal end that can get in the way. You should have something that looks like this:
Next take the 1" strip and cut it into two pieces. I like them longer rather than shorter. you'll trim them later on so don't worry too much about the length. The should be at least 3" long to make your life easier.
Next, you'll pin the two 1" pieces to the zipper. Line up the edge of the fabric strip with the marking you made earlier. Pin in place.
Hint: make sure that the zipper tab is in between the two pieces you just pinned on. If you don't, you'll never be able to pen your bag.
Here's both pieces pinned in place. Note that the nonpinned side of the strip sticks into the middle of your zipper, not the other way around.
Using a 1/4" seam sew the two strips down.
Fold them back so you can see the right side of the fabric.
Top stitch in place.
Trim the ends of the zipper.so it is even with the seam. This will reduce the amount of bulk you'll be sewing later. Somehow, I missed taking pictures of this step.
Set zipper aside
Step 2: Make a pocket.
Take your two pocket pieces (outside and lining)
Line them up and sew along a LONG end of the pocket using a 1/4" seam.
Iron open.
Fold the lining fabric back behind the main pocket fabric. These two pieces will now be WRONG sides together. You should see a 1/4" strip of the lining fabric on the top edge of the pocket.
Top stitch along the upper edge.
Cut out 1 1/2" squares from the bottom corners like you did before.
Line up the pocket with one of the lining pieces.
If you'd like to have pockets on both sides of the bag, feel free to repeat the process to make a second pocket for the other side.
I hate it when items slip down into the bottom of the bag. To prevent this, I measure from corner to corner from the squares I cut out previously. I mark this line and then top stitch in place. This also helps hold the pocket and lining together.
Hint: I would baste along the edges of the pocket as well. Then they will be held in place while you complete the rest of the sewing on the bag. I just used pins, but I wish I had taken the time to baste them.
Step 3: Time to put in the zipper!
Mark the middles of the zipper, lining and outside fabric of the bag. I just use pins.
Layer the pieces of your bag: lining, zipper, outiside. The WRONG side of the zipper will be against the lining of the bag, while the right side of the zipper will face the right side of the outside fabric.
Pin in place, using the middles you marked earlier. Next, sew in place using a zipper foot on your machine. I use my fingers to feel where the zipper is and line up the foot. I like pins. Definitely use them for zippers.
Repeat for the other side.
Hint: If you have the option of using a needle-down on your machine, use it! Zippers are fiddly. I sew part of the zipper and then I unzip/rezip the zipper as needed to get it out of the way of my needle and then finish sewing the zipper.
When you've completed your zipper seams, it opens up to look like something like this. You can see how the outside fabric has the right side of the zipper. The little zipper fabric strips are sticking off and it's almost time to trim them.
Here is the reverse side with the pocket and the wrong side of the zipper.
Iron the zipper seams open. Take some time to do this. Make sure the fabric is far enough away from the zipper that it opens and closes freely.
A good trick is to line up the corners that you cout out previously.
Now it's time to add the decor bond. Zippers are so fiddly that I decided I didn't want to have to sew through decor bond in the initial zipper seam.
The decor bond is going to be ironed against the WRONG side of the outside fabric. Try to line up the corners that have been cut out.
I lay just one side flat on my ironing board, with the three other pieces sticking off the back. I take the decor bond and slide it up snug to the zipper seam. The decor bond sits under that seam allowance.
Iron in place. Follow the instructions that come with the decor bond or heavy interfacing.
Repeat on the other side.
Now, place the layers back in place so that you can see the zipper.
Top stitch the zipper in place. This will catch the decor bond you just ironed on.
Step 4: Make a strap. This is optional. If you don't wan the strap, just skip to the next step.
Take the 2 1/2" x 12" strip and iron in half.
Open it up, and then fold the two raw edges into the middle.
Here you can see them both ironed to the middle
Iron flat.
Top stitch along both long edges.
Place the strap on the size of the bag where the zipper tab is when it's closed.I measured about an inch down and pinned my strap in place
Step 5: Time to sew the bag together! Let the fun begin!
If you haven't trimmed the fabric strips from the end of the zipper, do that now. Trim them so they are even with the side of the bag.
You're going to pin the lining pieces together and the outside pieces together.
HINT: make sure you leave the zipper at least half way open. If you don't, you won't be able to turn your bag right side out!
Lots of pins. Pin all four sides. Leave a portion open on the bottom of the LINING of the bag. You need this so you can turn your bag right side out.
Sew around the edges. DON'T sew the corners you cut out. You'll sew those in the next step to create a bottom for your bag.
Here you can see the section that I left open to turn the bag.
Step 6: Create the bottom of your bag.
Open the seams up and match them in the middle. This is creating a squared bottom to the bag.
Using 1/4" seams sew along all four corners.
Here you can see the bottom of the outside of the bag. (inside out) This is a better picture to show how the seams come together and you sew the edges together.
Step 7: Turn the bag right side out through the opening in the bottom of the lining.
Use your fingers to push out the corners of the bag.
Open up the zipper all the way and push the edges of it out as well.
I iron 1/4" seams on the opening.
Pin it and sew it shut with a blind hem stitch or whip stitch. You could also just use a straight stitch on the machine and close the opening if you wish.
Push the lining into the bag. You're done!
Here's a picture of the pocket.
Thought: you could create multiple pockets by adding some top stitching on the pocket.
Step 9: Enjoy your new hexipuff bag!
Please use this tutorial for personal use only.
Subscribe to:
Posts (Atom)